> ## Documentation Index
> Fetch the complete documentation index at: https://docs.linkup.so/llms.txt
> Use this file to discover all available pages before exploring further.
# Linkup MCP Server
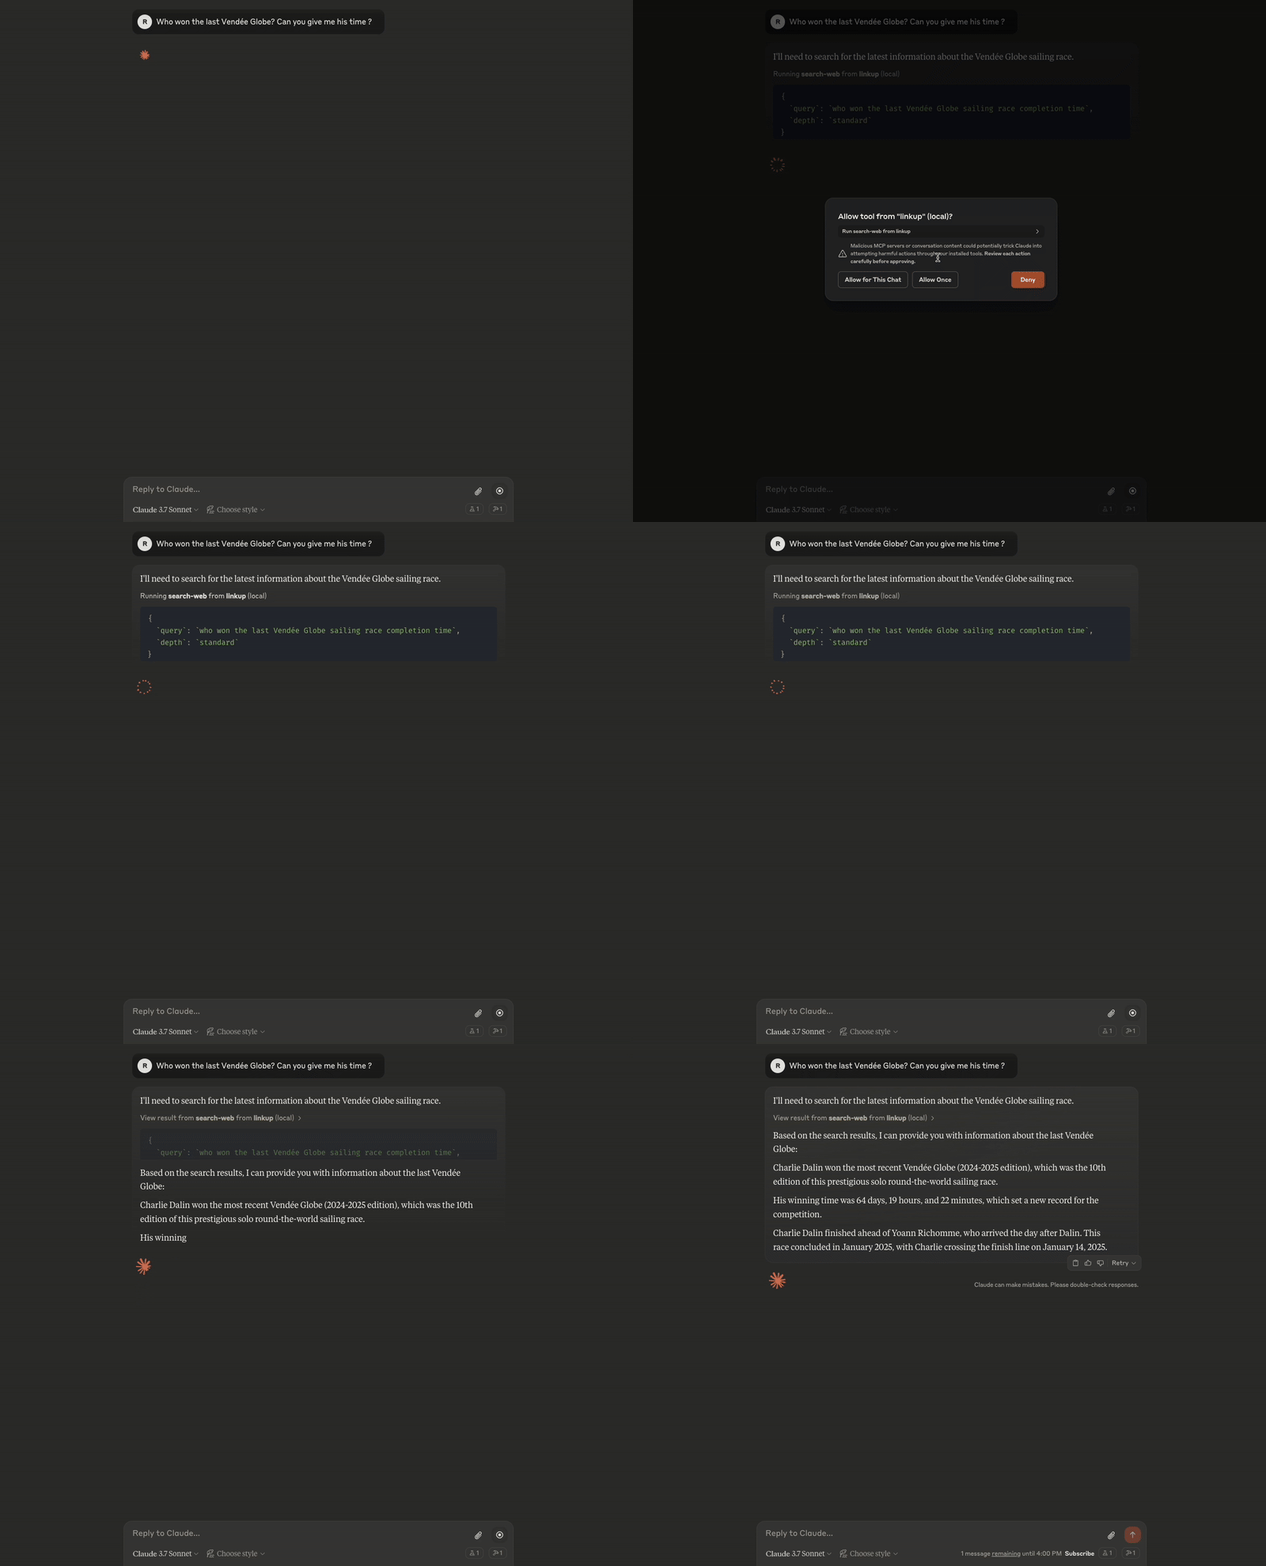
> Linkup MCP Server allows you to use the Linkup API in your MCP clients.
Developed by Anthropic, the [Model Context Protocol](https://github.com/modelcontextprotocol) (MCP) is an open protocol that standardizes how applications provide context to LLMs. It is particularly helpful when building agents and complex workflows on top of LLMs.
> Think of MCP like a USB-C port for AI applications. Just as USB-C provides a standardized way to connect your devices to various peripherals and accessories, MCP provides a standardized way to connect AI models to different data sources and tools.
-*Anthropic*
Learn more about the Model Context Protocol in Anthropic's [official documentation](https://modelcontextprotocol.io/introduction)
## Set up Linkup via MCP
Linkup's hosted MCP server works in every major coding agent — one command
or one click. Unlike keyless demos, Linkup runs on your own key, so grab it
first, then add the server and replace `YOUR_API_KEY` with your key.
Create a Linkup account for free to get your API key.
Adds Linkup as a remote MCP server in Claude Code.
```bash theme={"system"}
claude mcp add --transport http linkup https://mcp.linkup.so/mcp?apiKey=YOUR_API_KEY
```
Prefer to send the key as a header instead of in the URL:
```bash theme={"system"}
claude mcp add --transport http linkup https://mcp.linkup.so/mcp --header "Authorization: Bearer YOUR_API_KEY"
```
In Claude Code, run `/mcp` to confirm `linkup` appears in your
connected servers.
Adds Linkup to Codex via its local npm package.
```bash theme={"system"}
codex mcp add linkup -- npx -y linkup-mcp-server apiKey=YOUR_API_KEY
```
Run `codex mcp list` to confirm `linkup` is registered. To connect to
the hosted endpoint over HTTP instead, see [Remote MCP](#remote-mcp)
below.
[](https://cursor.com/en-US/install-mcp?name=linkup\&config=eyJ0eXBlIjoiaHR0cCIsInVybCI6Imh0dHBzOi8vbWNwLmxpbmt1cC5zby9tY3A%2FYXBpS2V5PVlPVVJfQVBJX0tFWSJ9)
Cursor opens with the server prefilled. Replace `YOUR_API_KEY` with
your key, then enable it.
Open Cursor Settings → MCP and confirm `linkup` is listed and enabled.
[](vscode:mcp/install?name=linkup\&config=%7B%22type%22%3A%22http%22%2C%22url%22%3A%22https%3A%2F%2Fmcp.linkup.so%2Fmcp%3FapiKey%3DYOUR_API_KEY%22%7D)
VS Code opens with the server prefilled. Replace `YOUR_API_KEY` with
your key, then start the server.
Run **MCP: List Servers** from the Command Palette and confirm
`linkup` appears.
Prefer to edit config files by hand, use the single-file MCPB bundle for
Claude Desktop, or run the server locally? See all install options below.
Use our hosted MCP endpoint (recommended)
Single-file bundle for Claude Desktop
Run MCP locally with NPM package
View the source code and see detailed documentation
The Linkup MCP server is compatible with any MCP client, such as [Cursor](https://docs.cursor.com/context/model-context-protocol) or [Claude
Desktop](https://modelcontextprotocol.io/quickstart/user). Choose between local installation or our hosted endpoint based on your needs.
## Features
The Linkup MCP server provides the following tools:
* **`linkup-search`**: Real-time web search with natural language queries
* Standard and deep search modes
* Domain include/exclude lists, date range filters, max results, and optional image results
* Access to current information from trusted sources
* **`linkup-research`**: Start autonomous, long-running research tasks
* Multi-source investigation for questions a single search query cannot resolve
* Synthesized, cited answers from the [**Research**](/pages/documentation/endpoints/research/overview) endpoint
* Async workflow: start a task, then poll for completion
* **`linkup-get-research`**: Retrieve the status and result of a research task
* Poll by task `id` until the task is completed or failed
* Read completed answers from the task's `output` field
* **`linkup-fetch`**: Fetch and extract content from any webpage
* Optional JavaScript rendering for dynamic content
* Optional image extraction and raw HTML output
* Perfect for article extraction and content analysis
 ## Remote MCP
Use our hosted MCP endpoint for a quick setup without any local installation. This is the recommended approach for most users.
### Prerequisites
To use Remote MCP, you need:
* A Linkup API key
* Any MCP client that supports remote MCP over HTTP
Create a Linkup account for free to get your API key.
### Authentication
If your MCP client supports custom HTTP headers, prefer sending your API key as:
```http theme={"system"}
Authorization: Bearer YOUR_API_KEY
```
If your client cannot send custom headers, the hosted endpoint also supports the `?apiKey=...` query parameter.
### Manual Configuration
[](https://cursor.com/en-US/install-mcp?name=linkup\&config=eyJ0eXBlIjoiaHR0cCIsInVybCI6Imh0dHBzOi8vbWNwLmxpbmt1cC5zby9tY3A%2FYXBpS2V5PVlPVVJfQVBJX0tFWSJ9)
Add to your `~/.cursor/mcp.json`:
```json theme={"system"}
{
"mcpServers": {
"linkup": {
"type": "http",
"url": "https://mcp.linkup.so/mcp?apiKey=YOUR_API_KEY"
}
}
}
```
Add to your VS Code MCP config:
```json theme={"system"}
{
"servers": {
"linkup": {
"url": "https://mcp.linkup.so/mcp?apiKey=YOUR_API_KEY",
"type": "http"
}
}
}
```
Add to `~/.codex/config.toml`:
```toml theme={"system"}
[mcp_servers.linkup]
url = "https://mcp.linkup.so/mcp"
bearer_token_env_var = "LINKUP_API_KEY"
enabled = true
```
If you need to use the query parameter instead:
```toml theme={"system"}
[mcp_servers.linkup]
url = "https://mcp.linkup.so/mcp?apiKey=YOUR_API_KEY"
enabled = true
```
Replace `YOUR_API_KEY` with your actual API key. If your client supports custom headers, `Authorization: Bearer` is preferred over putting the key in the URL.
## MCPB Bundle
Download a pre-built MCPB (MCP Bundle) - a self-contained, single-file package that works across compatible MCP clients. This is the recommended approach for Claude Desktop.
### What is MCPB?
MCPB (MCP Bundle) is a new format developed by Anthropic for distributing MCP servers. Learn more in the [official MCPB documentation](https://github.com/anthropics/mcpb).
### Download
**Quick Download:**
```bash theme={"system"}
curl -L -o linkup-mcp-server.mcpb https://github.com/LinkupPlatform/linkup-mcp-server/releases/latest/download/linkup-mcp-server.mcpb
```
Or download directly from [here](https://github.com/LinkupPlatform/linkup-mcp-server/releases/latest/download/linkup-mcp-server.mcpb).
### Installation
Use the curl command above or download from GitHub releases.
Double-click the `.mcpb` file to install it in Claude Desktop.
When prompted, enter your Linkup API key.
## Local MCP
Run the Linkup MCP server locally using NPM.
### Prerequisites
* A Linkup API key
* Node.js (v24.0.0 or higher)
Create a Linkup account for free to get your API key.
### Configuration Examples
Edit `~/Library/Application Support/Claude/claude_desktop_config.json`:
```json theme={"system"}
{
"mcpServers": {
"linkup": {
"command": "npx",
"args": ["-y", "linkup-mcp-server", "apiKey=YOUR_LINKUP_API_KEY"]
}
}
}
```
Edit `~/.cursor/mcp.json`:
```json theme={"system"}
{
"mcpServers": {
"linkup": {
"command": "npx",
"args": ["-y", "linkup-mcp-server", "apiKey=YOUR_LINKUP_API_KEY"]
}
}
}
```
Add to your VS Code MCP config:
```json theme={"system"}
{
"servers": {
"linkup": {
"command": "npx",
"type": "stdio",
"args": ["-y", "linkup-mcp-server", "apiKey=YOUR_LINKUP_API_KEY"]
}
}
}
```
Add to `~/.codex/config.toml`:
```toml theme={"system"}
[mcp_servers.linkup]
command = "npx"
args = ["-y", "linkup-mcp-server", "apiKey=YOUR_LINKUP_API_KEY"]
enabled = true
```
Replace `YOUR_LINKUP_API_KEY` with your actual API key, then restart your application.
For more configuration examples and advanced usage, see the [GitHub README](https://github.com/LinkupPlatform/linkup-mcp-server#readme).
## Available tools
Once configured, you'll have access to four tools:
### linkup-search
Search the web in real time to retrieve current information, facts, and news from trusted sources.
**Parameters:**
* `query` (required): Natural language search query. Full questions work best.
* `depth` (optional): Search depth - `"standard"` (default) or `"deep"`
* `"standard"`: For queries with direct answers leveraging agentic search (weather, stock prices, simple facts)
* `"deep"`: For complex research requiring analysis across multiple sources
The Linkup API also supports a `"fast"` depth, but the MCP server only exposes `"standard"` and `"deep"`. If you need `"fast"`, call the API directly via the [SDKs](/pages/sdk/python/python) or the [`/search` endpoint](/pages/documentation/endpoints/search/reference).
* `includeImages` (optional, default `false`): Return relevant images alongside text results, each with a URL and metadata.
* `includeDomains` (optional): Array of domains to restrict results to, e.g. `["bbc.com", "reuters.com"]`. Max 100 domains.
* `excludeDomains` (optional): Array of domains to exclude from results, e.g. `["reddit.com", "quora.com"]`.
* `fromDate` (optional): Only include content published on or after this date. Format: `YYYY-MM-DD`.
* `toDate` (optional): Only include content published on or before this date. Format: `YYYY-MM-DD`.
* `maxResults` (optional): Maximum number of results to return (positive integer).
**Example prompts:**
* "Search for the latest news about AI developments"
* "What's the current weather in Tokyo?"
* "Find information about the new EU AI Act, only from bbc.com and reuters.com, published this year"
### linkup-research
Start an autonomous [**Research**](/pages/documentation/endpoints/research/overview) task that investigates the web to answer questions a single search query cannot resolve. Use it for verified answers to precise questions, focused investigations of a defined subject, or broad multi-angle reports.
Research is async and long-running. The tool returns immediately with a task `id` and `status` such as `"pending"` rather than the final answer. Poll `linkup-get-research` with that `id` until the task reaches a terminal status.
**Parameters:**
* `query` (required): Natural language research question. Detailed, full questions work best.
* `mode` (optional): Controls the type of investigation. Use `"answer"` for a precise, evidence-backed answer, `"investigate"` for a focused report on one subject, or `"research"` for a structured report across many topics. Omit it to let Linkup classify the question.
* `reasoningDepth` (optional): How much reasoning effort the task spends, trading latency for coverage. Use `"S"` for light coverage, `"M"` for balanced, `"L"` (default) for thorough, or `"XL"` for exhaustive.
* `includeDomains` (optional): Array of domains to restrict results to, e.g. `["bbc.com", "reuters.com"]`. Recommended; max 100 domains.
* `excludeDomains` (optional): Array of domains to exclude from results, e.g. `["reddit.com", "quora.com"]`.
* `fromDate` (optional): Only include content published on or after this date. Format: `YYYY-MM-DD`.
* `toDate` (optional): Only include content published on or before this date. Format: `YYYY-MM-DD`.
The MCP tool uses `query`, while the raw `/research` API uses `q`. The MCP server also fixes `outputType` to `"sourcedAnswer"`; use the API directly if you need `"structured"` output with `structuredOutputSchema`.
**Example prompts:**
* "Compare the 2024 cloud revenue growth of Microsoft, Amazon, and Google."
* "Research the main regulatory differences between the EU AI Act and the US AI executive order."
* "Investigate the current vendor landscape for enterprise browser security."
### linkup-get-research
Retrieve the current state of a research task started with `linkup-research`.
**Parameters:**
* `id` (required): The research task id returned by `linkup-research`.
**Behavior:**
* Returns the task object with its `status` (`"pending"`, `"processing"`, `"completed"`, or `"failed"`).
* While the status is `"pending"` or `"processing"`, keep polling every few seconds until a terminal state. Polling faster than once per second is rate-limited.
* When `"completed"`, the result is in the `output` field. When `"failed"`, the reason is in the `error` field.
### linkup-fetch
Fetch and extract content from any webpage URL.
**Parameters:**
* `url` (required): The URL to fetch content from
* `renderJs` (optional, default `false`): Whether to render JavaScript content.
* Enable for dynamic pages that load content via JavaScript
* Note: the request takes longer to complete
* `extractImages` (optional, default `false`): Extract images found on the page and return them in a dedicated `images` field. Useful when you need a list of all images for further processing or analysis.
* `includeRawHtml` (optional, default `false`): Include the page's raw HTML in a dedicated `rawHtml` field. Useful for custom HTML parsing, preserving specific formatting, or accessing elements that might be filtered out during standard content extraction.
**Example prompts:**
* "Fetch the content from [https://example.com/article](https://example.com/article)"
* "Get this blog post and summarize it: [https://blog.example.com/post](https://blog.example.com/post)"
* "What are the events happening in Paris this week? Fetch the content from [https://example.com/events](https://example.com/events)"
## Troubleshooting
### Authentication Format
**Important**: Current versions of the Linkup MCP server use a different authentication format than `v1.x`:
**Correct (v2.x and later):**
```json theme={"system"}
{
"args": ["-y", "linkup-mcp-server", "apiKey=YOUR_API_KEY"]
}
```
**Old format (v1.x), no longer supported:**
```json theme={"system"}
{
"env": {
"LINKUP_API_KEY": "YOUR_API_KEY"
}
}
```
If you were using v1.x, please update your configuration to the new format.
**Need help?** Email `support@linkup.so`, ping us on [Discord](https://discord.com/invite/9q9mCYJa86), or [talk to us](https://calendar.app.google/zNUZz7RxgMMk9pKW7).
## Remote MCP
Use our hosted MCP endpoint for a quick setup without any local installation. This is the recommended approach for most users.
### Prerequisites
To use Remote MCP, you need:
* A Linkup API key
* Any MCP client that supports remote MCP over HTTP
Create a Linkup account for free to get your API key.
### Authentication
If your MCP client supports custom HTTP headers, prefer sending your API key as:
```http theme={"system"}
Authorization: Bearer YOUR_API_KEY
```
If your client cannot send custom headers, the hosted endpoint also supports the `?apiKey=...` query parameter.
### Manual Configuration
[](https://cursor.com/en-US/install-mcp?name=linkup\&config=eyJ0eXBlIjoiaHR0cCIsInVybCI6Imh0dHBzOi8vbWNwLmxpbmt1cC5zby9tY3A%2FYXBpS2V5PVlPVVJfQVBJX0tFWSJ9)
Add to your `~/.cursor/mcp.json`:
```json theme={"system"}
{
"mcpServers": {
"linkup": {
"type": "http",
"url": "https://mcp.linkup.so/mcp?apiKey=YOUR_API_KEY"
}
}
}
```
Add to your VS Code MCP config:
```json theme={"system"}
{
"servers": {
"linkup": {
"url": "https://mcp.linkup.so/mcp?apiKey=YOUR_API_KEY",
"type": "http"
}
}
}
```
Add to `~/.codex/config.toml`:
```toml theme={"system"}
[mcp_servers.linkup]
url = "https://mcp.linkup.so/mcp"
bearer_token_env_var = "LINKUP_API_KEY"
enabled = true
```
If you need to use the query parameter instead:
```toml theme={"system"}
[mcp_servers.linkup]
url = "https://mcp.linkup.so/mcp?apiKey=YOUR_API_KEY"
enabled = true
```
Replace `YOUR_API_KEY` with your actual API key. If your client supports custom headers, `Authorization: Bearer` is preferred over putting the key in the URL.
## MCPB Bundle
Download a pre-built MCPB (MCP Bundle) - a self-contained, single-file package that works across compatible MCP clients. This is the recommended approach for Claude Desktop.
### What is MCPB?
MCPB (MCP Bundle) is a new format developed by Anthropic for distributing MCP servers. Learn more in the [official MCPB documentation](https://github.com/anthropics/mcpb).
### Download
**Quick Download:**
```bash theme={"system"}
curl -L -o linkup-mcp-server.mcpb https://github.com/LinkupPlatform/linkup-mcp-server/releases/latest/download/linkup-mcp-server.mcpb
```
Or download directly from [here](https://github.com/LinkupPlatform/linkup-mcp-server/releases/latest/download/linkup-mcp-server.mcpb).
### Installation
Use the curl command above or download from GitHub releases.
Double-click the `.mcpb` file to install it in Claude Desktop.
When prompted, enter your Linkup API key.
## Local MCP
Run the Linkup MCP server locally using NPM.
### Prerequisites
* A Linkup API key
* Node.js (v24.0.0 or higher)
Create a Linkup account for free to get your API key.
### Configuration Examples
Edit `~/Library/Application Support/Claude/claude_desktop_config.json`:
```json theme={"system"}
{
"mcpServers": {
"linkup": {
"command": "npx",
"args": ["-y", "linkup-mcp-server", "apiKey=YOUR_LINKUP_API_KEY"]
}
}
}
```
Edit `~/.cursor/mcp.json`:
```json theme={"system"}
{
"mcpServers": {
"linkup": {
"command": "npx",
"args": ["-y", "linkup-mcp-server", "apiKey=YOUR_LINKUP_API_KEY"]
}
}
}
```
Add to your VS Code MCP config:
```json theme={"system"}
{
"servers": {
"linkup": {
"command": "npx",
"type": "stdio",
"args": ["-y", "linkup-mcp-server", "apiKey=YOUR_LINKUP_API_KEY"]
}
}
}
```
Add to `~/.codex/config.toml`:
```toml theme={"system"}
[mcp_servers.linkup]
command = "npx"
args = ["-y", "linkup-mcp-server", "apiKey=YOUR_LINKUP_API_KEY"]
enabled = true
```
Replace `YOUR_LINKUP_API_KEY` with your actual API key, then restart your application.
For more configuration examples and advanced usage, see the [GitHub README](https://github.com/LinkupPlatform/linkup-mcp-server#readme).
## Available tools
Once configured, you'll have access to four tools:
### linkup-search
Search the web in real time to retrieve current information, facts, and news from trusted sources.
**Parameters:**
* `query` (required): Natural language search query. Full questions work best.
* `depth` (optional): Search depth - `"standard"` (default) or `"deep"`
* `"standard"`: For queries with direct answers leveraging agentic search (weather, stock prices, simple facts)
* `"deep"`: For complex research requiring analysis across multiple sources
The Linkup API also supports a `"fast"` depth, but the MCP server only exposes `"standard"` and `"deep"`. If you need `"fast"`, call the API directly via the [SDKs](/pages/sdk/python/python) or the [`/search` endpoint](/pages/documentation/endpoints/search/reference).
* `includeImages` (optional, default `false`): Return relevant images alongside text results, each with a URL and metadata.
* `includeDomains` (optional): Array of domains to restrict results to, e.g. `["bbc.com", "reuters.com"]`. Max 100 domains.
* `excludeDomains` (optional): Array of domains to exclude from results, e.g. `["reddit.com", "quora.com"]`.
* `fromDate` (optional): Only include content published on or after this date. Format: `YYYY-MM-DD`.
* `toDate` (optional): Only include content published on or before this date. Format: `YYYY-MM-DD`.
* `maxResults` (optional): Maximum number of results to return (positive integer).
**Example prompts:**
* "Search for the latest news about AI developments"
* "What's the current weather in Tokyo?"
* "Find information about the new EU AI Act, only from bbc.com and reuters.com, published this year"
### linkup-research
Start an autonomous [**Research**](/pages/documentation/endpoints/research/overview) task that investigates the web to answer questions a single search query cannot resolve. Use it for verified answers to precise questions, focused investigations of a defined subject, or broad multi-angle reports.
Research is async and long-running. The tool returns immediately with a task `id` and `status` such as `"pending"` rather than the final answer. Poll `linkup-get-research` with that `id` until the task reaches a terminal status.
**Parameters:**
* `query` (required): Natural language research question. Detailed, full questions work best.
* `mode` (optional): Controls the type of investigation. Use `"answer"` for a precise, evidence-backed answer, `"investigate"` for a focused report on one subject, or `"research"` for a structured report across many topics. Omit it to let Linkup classify the question.
* `reasoningDepth` (optional): How much reasoning effort the task spends, trading latency for coverage. Use `"S"` for light coverage, `"M"` for balanced, `"L"` (default) for thorough, or `"XL"` for exhaustive.
* `includeDomains` (optional): Array of domains to restrict results to, e.g. `["bbc.com", "reuters.com"]`. Recommended; max 100 domains.
* `excludeDomains` (optional): Array of domains to exclude from results, e.g. `["reddit.com", "quora.com"]`.
* `fromDate` (optional): Only include content published on or after this date. Format: `YYYY-MM-DD`.
* `toDate` (optional): Only include content published on or before this date. Format: `YYYY-MM-DD`.
The MCP tool uses `query`, while the raw `/research` API uses `q`. The MCP server also fixes `outputType` to `"sourcedAnswer"`; use the API directly if you need `"structured"` output with `structuredOutputSchema`.
**Example prompts:**
* "Compare the 2024 cloud revenue growth of Microsoft, Amazon, and Google."
* "Research the main regulatory differences between the EU AI Act and the US AI executive order."
* "Investigate the current vendor landscape for enterprise browser security."
### linkup-get-research
Retrieve the current state of a research task started with `linkup-research`.
**Parameters:**
* `id` (required): The research task id returned by `linkup-research`.
**Behavior:**
* Returns the task object with its `status` (`"pending"`, `"processing"`, `"completed"`, or `"failed"`).
* While the status is `"pending"` or `"processing"`, keep polling every few seconds until a terminal state. Polling faster than once per second is rate-limited.
* When `"completed"`, the result is in the `output` field. When `"failed"`, the reason is in the `error` field.
### linkup-fetch
Fetch and extract content from any webpage URL.
**Parameters:**
* `url` (required): The URL to fetch content from
* `renderJs` (optional, default `false`): Whether to render JavaScript content.
* Enable for dynamic pages that load content via JavaScript
* Note: the request takes longer to complete
* `extractImages` (optional, default `false`): Extract images found on the page and return them in a dedicated `images` field. Useful when you need a list of all images for further processing or analysis.
* `includeRawHtml` (optional, default `false`): Include the page's raw HTML in a dedicated `rawHtml` field. Useful for custom HTML parsing, preserving specific formatting, or accessing elements that might be filtered out during standard content extraction.
**Example prompts:**
* "Fetch the content from [https://example.com/article](https://example.com/article)"
* "Get this blog post and summarize it: [https://blog.example.com/post](https://blog.example.com/post)"
* "What are the events happening in Paris this week? Fetch the content from [https://example.com/events](https://example.com/events)"
## Troubleshooting
### Authentication Format
**Important**: Current versions of the Linkup MCP server use a different authentication format than `v1.x`:
**Correct (v2.x and later):**
```json theme={"system"}
{
"args": ["-y", "linkup-mcp-server", "apiKey=YOUR_API_KEY"]
}
```
**Old format (v1.x), no longer supported:**
```json theme={"system"}
{
"env": {
"LINKUP_API_KEY": "YOUR_API_KEY"
}
}
```
If you were using v1.x, please update your configuration to the new format.
**Need help?** Email `support@linkup.so`, ping us on [Discord](https://discord.com/invite/9q9mCYJa86), or [talk to us](https://calendar.app.google/zNUZz7RxgMMk9pKW7).